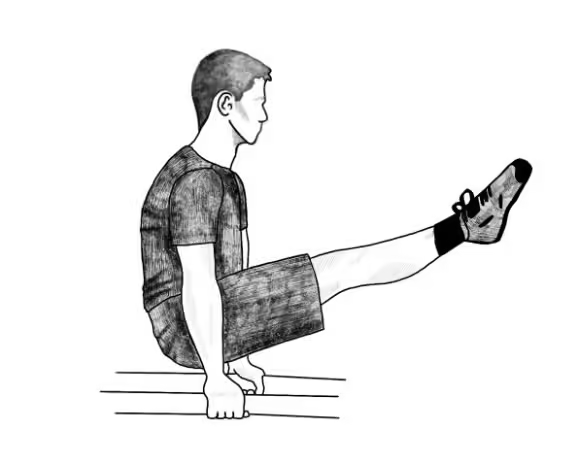
No matter what you think about calisthenics, you have to try the L-sit at some point. Yes, it’s that good.
Despite looking fairly easy at first, this exercise is a true stability, strength, and stability challenge for your hip flexors, core, and even your shoulders.
If you tried it and failed, though, don’t get discouraged. Let’s talk about how to do the L-sit properly, how to build up to it, and what kind of benefits to expect from it.
Table of Contents
What Is an L-Sit?
The L-sit is an isometric calisthenic hold, consisting of putting your legs (straightened) and torso (upright) at a 90° angle. It got its name from the figure your body makes – the letter L.
To break it down – isometric essentially means “no joints move during the exercise”, and calisthenic means that you do it with your own body weight.
In more simple terms, the L-sit (sometimes called the L-hold) is a static exercise in which you hold the L position for as long as you can without breaking form.
It sounds simple “on paper” but the L-sit requires some athleticism to be executed correctly. No matter, it benefits all sorts of athletes – lifters, runners, or hybrid. Especially from the perspective of injury prevention.
L-Sit Benefits
This (advanced) isometric exercise targets three muscle groups primarily, with a lot of carryover to surrounding muscles. The correct execution relies on:
- Lower core muscle strength and stability
- Hip flexor strength and endurance, as well as mobility
- Shoulder strength and mobility
Knowing which muscles the L-sit tackles, we can already predict the upsides of the exercise. But the benefits go beyond just these 3 muscle groups.
Here are the benefits of doing L-sits:
- Hip flexor strength and stability – your hip flexors are helping you bring and keep your legs into the L position
- Knee health – by extension (pun not intended), strong hip flexors directly affect knee stability during dynamic exercises
- Lower core endurance – due to the isometric nature of the exercise, you can expect better pelvic alignment (also great for anterior pelvic tilt)
- Shoulder stability and strength – your shoulders basically carry your body weight during the L-sit. This directly translates to shoulder gains
- Posture correction – your thoracic spine and scapulas also work hard to keep the tension, making this exercise great for correcting your posture.

How to do an L-sit
Before we get into the how-to, it’s important to note that the L-sit can be done both on the ground (floor) or by using the parallettes. The ground variation is arguably harder because you have less space for your legs, and you need advanced wrist strength and mobility. However, if you start from the ground up (ok, now the pun is intended), you can use the L-sit to level up your wrist game.
Here’s how to do the L-sit:
- Sit on the ground with your legs extended straight in front of you, your toes pointed away from you.
- Place your hands on the ground beside your hips, fingers pointing forward.
- Engage your core by pulling your belly button towards your spine.
- Press firmly into the ground with your hands to lift your hips off the ground.
- Simultaneously, lift your legs off the ground, keeping them straight and close together.
- Aim to form an “L” shape with your body, with your legs parallel to the ground and your torso upright. Going sharper than 90° is advanced.
- Hold this position, maintaining tension in your core, hip flexors, and shoulders.
Cues and Tips
Here’s a list of quick tips on how to properly do the L-sit:
- Make sure to keep your hips under your shoulders at all times
- Do not shrug. Think of it as keeping your shoulders as far away from your ears
- Try not to push your legs in. By squeezing you are putting the tension in the wrong spot
- Rotate your elbows out to help with reaching the tension in your shoulders
- Point your toes out as much as you can (plantar flexion) to help with keeping the tension throughout your body
How to build up to an L-sit
L-sits are difficult, there’s no two ways about it. Here’s a list of progression you can do to get to a full L-sit:
- Raise one leg at a time – this builds your hip flexors over time.
- By touching the floor with your heels, use your shoulders to prop yourself up. This prepares your shoulders and core.
- Do a knee tuck and hold for as long as you can. This is similar to (but less difficult than) the N-sit (aka N-hold) in calisthenics.
- Do leg extensions from the tuck-and-hold, one leg at a time. Spice things up by holding each of your legs in full extension for a brief moment.
In conclusion: L-Sit for W Bulletproofing Benefits
The L-sit is one of those exercises that are not so easy to master, but they bring benefits to everyone, not just the calisthenics bros. Runners benefit from the extra hip flexor strength and stability. Lifters greatly benefit from the isometric nature of the movement. Hybrid athletes benefit from all of the above, plus the much-needed injury-prevention aspect of the exercise.
So, don’t let the slow progression scare you away. Start slow, follow the tips and cues we talked about, and turn that L-sit into a W for your body.
Get the Best Body Bulletproofing Exercise Gear At Our Shop:
GET THE BEST INJURY-PREVENTION TRAINING EQUIPMENT:
Above all, a storyteller. Then comes marketing, branding, writing music, powerlifting, and woodworking.


